Transforming Everyday Objects into Art: A Guide to Homemade Brushes and Origami Garlands
In an era dominated by digital screens and mass-produced decor, there is a profound satisfaction in creating something tangible with your own hands. The intersection of mark making, sustainable crafting, and paper engineering offers a unique pathway to mindfulness and artistic expression. This guide explores a creative workshop concept led by Alexandra, where participants learn to craft homemade brushes from household materials, create abstract prints on origami paper, and assemble these creations into a stunning fairy light garland using origami balloons.
The Philosophy of Resourceful Creativity
Before diving into the technical aspects, it is essential to understand the significance of using what you have. In modern creative education, there is often a misconception that high-quality art requires expensive tools. However, resourcefulness is a critical skill in both artistic and professional contexts. By looking at your garden or recycling bin not as waste, but as a palette of textures, you shift your perspective from consumer to creator.
This approach aligns with the principles of sustainable design and circular economy thinking. When you create a brush from a twig or a bundle of dried grass, you are engaging in a practice that reduces waste while fostering a deeper connection to your immediate environment. This mindset is increasingly valuable in business and education, where innovation often stems from constraint rather than abundance.
Why Mark Making Matters
Mark making is the foundation of all visual art. It is the physical act of leaving a trace. Unlike drawing, which often aims for representation, mark making focuses on texture, rhythm, and gesture. Using homemade brushes introduces an element of unpredictability that standard synthetic brushes lack. Each homemade tool has its own "personality," forcing the artist to adapt and respond to the material rather than controlling it completely.
Step 1: Crafting Your Own Brushes
The first phase of this creative journey involves gathering materials. Alexandra encourages students to look around their house and garden. The goal is to find items that can hold ink or paint and transfer it to paper with varying degrees of absorption and stiffness.
- Garden Findings: Twigs, pine needles, fern fronds, and dried flower heads can be bundled together with string to create rustic, textured brushes.
- Household Items: Old toothbrushes, sponges cut into shapes, cotton swabs, and even crumpled paper towels can serve as effective applicators.
- Kitchen Scraps: Bundles of uncooked spaghetti or stiff vegetable stalks can create fine, linear marks.
To construct a brush, simply gather your chosen material into a bundle. Secure the base tightly with twine, rubber bands, or tape. If using a stick, you can attach the bundle to the end to create a handle. The key is experimentation; test different densities and lengths to see how they affect the flow of ink.
Step 2: Abstract Black and White Printmaking
Once your brushes are ready, the focus shifts to mark making on origami paper. Origami paper is typically thin, crisp, and holds folds well, but it also absorbs ink quickly, creating soft, bleeding edges that add depth to abstract designs.
The Process
- Prepare Your Workspace: Lay down newspaper or a protective sheet. Use black ink or watercolor paint for high contrast against white or colored origami paper.
- Experiment with Pressure: Dip your homemade brush into the ink. Try pressing hard for bold, saturated marks, and then lightly dragging the brush for faint, textured lines.
- Embrace Abstraction: Do not aim to draw recognizable objects. Instead, focus on the rhythm of your hand. Create patterns, clusters, and solitary strokes. Let the unique texture of your homemade brush dictate the outcome.
- Dry Thoroughly: Allow the paper to dry completely before handling. This is crucial for the next step, as damp paper will tear easily during folding.
This stage teaches patience and acceptance. Since each brush behaves differently, no two prints will be identical. This variability is not a flaw but a feature, ensuring that your final garland will have a rich, organic diversity.
Step 3: Folding Origami Balloons
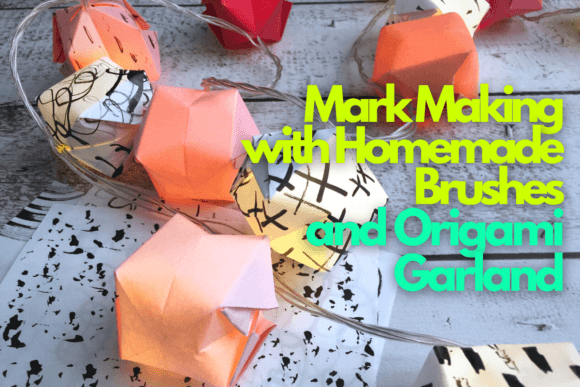
The third component transforms your flat, printed sheets into three-dimensional objects. The origami balloon, also known as the water bomb base, is a classic fold that is surprisingly simple yet structurally sound. It serves as the perfect vessel for housing small fairy lights.
Many beginners assume origami requires complex mathematical precision. While accuracy helps, the beauty of paper crafts lies in the human touch. Slight imperfections in the fold add character to the final piece. The process involves collapsing a square sheet into a smaller square, then opening pockets to inflate the shape into a cube-like balloon. When made from your custom-printed paper, each balloon becomes a unique lantern shade.
Common Misunderstandings in Paper Folding
A common barrier for newcomers is the fear of "ruining" the paper. It is important to clarify that paper is forgiving. If a crease is misaligned, you can often adjust it before the final inflation. Furthermore, the abstract nature of the black and white prints means that minor folding errors are visually masked by the busy, textured patterns you created earlier.
Step 4: Assembling the Fairy Light Garland
The final step brings all elements together. You now have a collection of patterned origami balloons. To turn them into a garland, you will need a string of battery-operated fairy lights. These are preferred over plug-in versions for safety and ease of placement.
Gently insert a single LED bulb into the opening of each origami balloon. The thin paper will diffuse the light, creating a soft glow that highlights the black ink marks. Space the balloons evenly along the wire. The result is a luminous installation that casts intricate shadows on the walls, transforming any room into a serene, artistic space.
The Broader Impact of DIY Craft
Engaging in projects like this extends beyond mere decoration. It fosters creative confidence. When you realize you can make tools from weeds and turn paper into light fixtures, you begin to see potential in everyday objects. This skill set is transferable to problem-solving in professional environments, where resourcefulness and lateral thinking are highly valued.
Moreover, in an educational context, this activity integrates science (material properties), math (geometry of folding), and art (composition and color). It demonstrates that learning is holistic and that creativity is not a separate subject but a way of interacting with the world.
Practical Relevance in Modern Life
In our fast-paced digital lives, tactile activities provide a necessary counterbalance. The sensory experience of handling rough twigs, smelling the ink, and feeling the crisp fold of paper grounds us in the present moment. This mindfulness aspect is increasingly recognized as vital for mental well-being. Creating a homemade origami garland is not just about the end product; it is about the process of slowing down and engaging with materials in a meaningful way.
Conclusion
The journey from garden waste to glowing garland illustrates the power of simple, intentional creativity. By making your own brushes, you reclaim agency over your tools. By practicing mark making, you express yourself without the pressure of perfection. By folding origami, you engage with geometry and structure. And by assembling the garland, you bring light and beauty into your home.
This project, inspired by Alexandra’s class, is accessible to everyone. It requires no special skills, only curiosity and a willingness to experiment. Whether you are a seasoned artist looking to break out of a rut or a beginner seeking a relaxing weekend activity, the combination of homemade brushes and origami offers a rewarding path to artistic discovery. Start gathering your materials today, and let your surroundings inspire your next masterpiece.